Summary of Week’s Activities
- Install the OpenCV library function.
- Modify the system files to connect to the wireless network.
- Run the test code which we have writted before.
Problem encountered and solutions
- When we installed the OpenCV library function, we found the CPU was in high load. We had to use the fan to cool down the chip.
- Since the OpenCV is compiled from the original code using gcc. We met the problem that the gcc version is not suitable for OpenCV 3.0.0.
- The code could not run for there are over three errors. After searching the answers in google, we debugged it.
Achievement in this week
- We connectd to the wireless network sucessfully. It means that we need not use the network cable anymore. The codes are shown as follows.
Install and compile OpenCV [1]
Install dependencies to support the build process of OpenCV
sudo apt-get install build-essential cmake pkg-config
sudo apt-get install python2.7-dev python3-dev
Install supporting libraries and packages used byOpenCV. These will also provide support for a wide range of image and video formats from within OpenCV
sudo apt-get install libjpeg-dev libtiff5-dev libjasper-dev
libpng12-dev
sudo apt-get install libavcodec-dev libavformat-dev libswscale-dev
libv4l-dev
sudo apt-get install libxvidcore-dev libx264-dev
sudo apt-get install libgtk2.0-dev
Install NumPy, which is very useful when manipulating image arrays within OpenCV, Automatically Tuned Linear Algebra Software (ATLAS), and GFortran for additional mathematic functionality
sudo apt-get install python3-numpy
sudo apt-get install libatlas-base-dev gfortran
Download OpenCV and OpenCV from GitHub. Create a build location
cd ~
wget -O opencv.zip https://github.com/Itseez/opencv/
archive/3.0.0.zip
unzip opencv.zip
wget -O opencv_contrib.zip https://github.com/Itseez/opencv_
contrib/archive/3.0.0.zip
unzip opencv_contrib.zip
cd opencv-3.0.0
mkdir build
cd build
The make file can be created using the following commands
-D CMAKE_BUILD_TYPE=RELEASE \
-D CMAKE_INSTALL_PREFIX=/usr/local \
-D INSTALL_C_EXAMPLES=ON \
-D INSTALL_PYTHON_EXAMPLES=ON \
-D OPENCV_EXTRA_MODULES_PATH=~/opencv_contrib-3.0.0/modules \
-D BUILD_EXAMPLES=ON ..
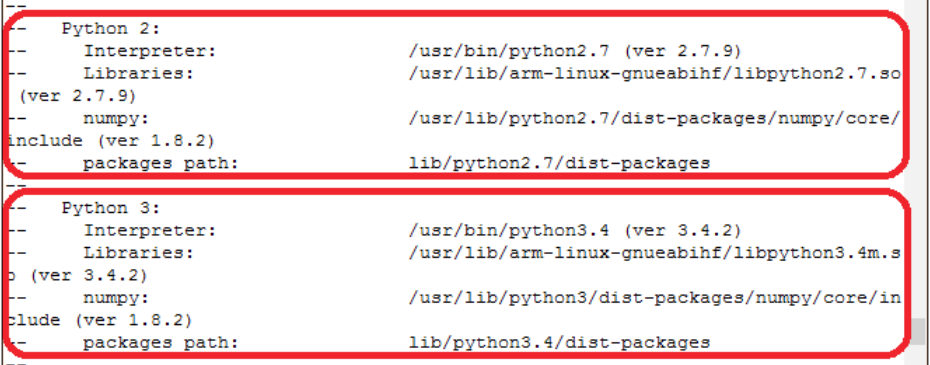
The information of OpenCV is shown as following picture
Compile OpenCV
make -j4 #use 4 cores
With OpenCV compiled successfully, it can be installed
sudo make install
- We found the problems in our code and solve them by searching in the Internet. It helped us to grasp the operating instructions.